Crafting your own crochet socks is not only a rewarding experience but also a wonderful way to create personalized, cozy essentials that perfectly fit your feet. Imagine slipping into a pair of socks you’ve meticulously crafted yourself—each stitch reflecting your dedication and creativity. Whether you’re a seasoned crocheter looking to expand your skills or a beginner eager to embark on this fulfilling journey, this guide is tailored just for you. We’ll walk you through every step, ensuring that by the end, you’ll have the confidence and knowledge to create socks that are both comfortable and stylish. From selecting the best yarns and hooks to mastering essential crochet stitches, we’ve got you covered. You’ll discover how the right materials can make all the difference in the texture and durability of your socks, setting the foundation for a successful project.
But that’s just the beginning. Have you ever struggled with getting the perfect fit or shaping the heel and toe just right? In this guide, you’ll learn how to measure your feet accurately to ensure your socks fit like a glove. We’ll provide a step-by-step guide to starting the sock cuff, followed by detailed instructions on crocheting the heel and employing turning techniques that create a seamless finish. Shaping the toe can be tricky, but with our tips and tricks, you’ll achieve a professional look with ease. And once your socks are almost finished, we’ll show you how to add those finishing touches, like weaving in ends and blocking, to give your socks that polished appearance. By the time you reach the end of this article, you’ll not only have a pair of beautifully crocheted socks but also the skills and confidence to continue creating more. So, grab your hooks and yarn, and let’s dive into the delightful world of crocheting socks that you’ll be proud to wear and share.
Selecting the Best Yarn and Hooks for Crochet Socks
Choosing the right yarn and hooks is essential for creating comfortable and durable crochet socks. For yarn, opt for materials that offer both softness and resilience. Merino wool is highly recommended due to its natural warmth and moisture-wicking properties, making it ideal for socks. Acrylic blends are also popular as they provide durability and are easy to care for, often being machine washable. When selecting yarn weight, fingering or sock weight yarns are the best choices, as they provide the right thickness and flexibility for snug-fitting socks.
- Fiber Content: Select yarns made from natural fibers like merino wool or bamboo for breathability and comfort.
- Yarn Weight: Choose fingering or sock weight yarn to ensure the socks are lightweight yet sturdy.
- Texture: Smooth yarns work best for detailed patterns, while boucle or textured yarns can add unique designs.
- Colorfastness: Ensure the yarn maintains its color after washing to keep socks looking new longer.
When it comes to hooks, the size must correspond to the yarn weight to achieve the correct gauge. For fingering weight yarn, a size G (4.0 mm) or H (5.0 mm) hook is typically suitable, while sock weight yarn might pair well with a size I (5.5 mm) or J (6.0 mm) hook. Material of the hook also affects performance; aluminum hooks are favored for their smoothness and durability, while ergonomic hooks can reduce hand strain during longer projects.
- Hook Size: Match the hook size to the yarn weight to ensure proper fit and elasticity of the socks.
- Hook Material: Aluminum hooks are preferred for their smooth gliding, whereas bamboo or wooden hooks offer a warmer feel.
- Comfort Grip: Ergonomic handles can provide better comfort and reduce fatigue during extended crocheting sessions.
- Interchangeable Hooks: Consider sets with interchangeable sizes for versatility in different parts of the sock pattern.
Additionally, consider the yarn composition and hook ergonomics to enhance the overall crocheting experience and final product quality. By carefully selecting high-quality yarn and appropriately sized hooks, you can create socks that are not only stylish but also offer lasting comfort and functionality.
Measuring Your Feet for Perfectly Fitting Socks
To ensure your socks fit perfectly, accurate foot measurements are essential. Begin by placing your foot on a piece of paper and tracing its outline to capture the natural shape. This trace will help in determining both the length and width of your foot. For precise measurement:
- Use a ruler to measure the longest part from the heel to the tip of your longest toe.
- Measure the widest part of your foot to determine the appropriate width.
- Consider measuring both feet, as one may be slightly larger than the other.
- Take measurements in the late afternoon or evening when your feet are at their largest.
- Wear the type of socks you intend to use during the measurement for the most accurate fit.
Additionally, take into account the thickness of any insoles or orthotics you may use, as this can affect the overall fit of the sock. By following these steps and paying attention to these details, you can select socks that provide comfort and support tailored to your specific foot dimensions.
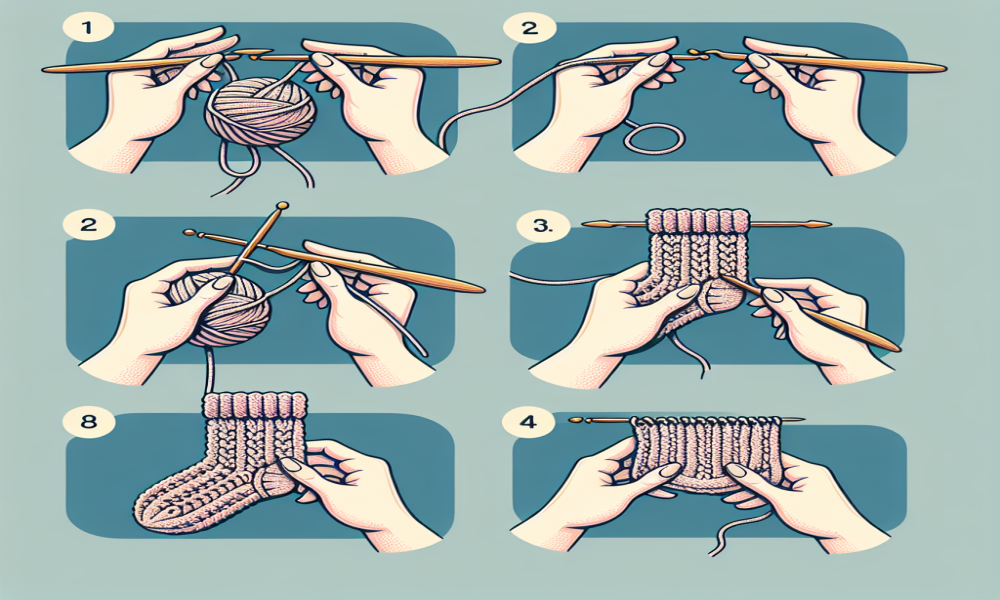
Step-by-Step Guide to Starting the Sock Cuff
Begin by selecting a flexible yarn and the appropriate needle size to ensure a comfortable fit. Cast on the required number of stitches using a method that provides elasticity, such as the German twisted cast on. Establish a ribbed pattern to create the stretchable cuff by alternating knit and purl stitches. Consistently maintain your tension to achieve an even and smooth cuff, which will enhance the sock’s overall appearance and durability.
- Choose Quality Materials: Opt for soft, durable yarn and the correct needle size.
- Cast On Stitches: Use an elastic cast on method for flexibility.
- Create Ribbing: Implement patterns like k1, p1 or k2, p2 to ensure stretch.
- Maintain Even Tension: Knit consistently to avoid uneven stitches.
Crocheting the Heel and Turning Techniques
Crocheting the heel involves creating a structured section that provides support and shape to the finished item. Key steps include forming the heel flap, increasing stitches for reinforcement, and integrating the heel with the main body seamlessly. Employing proper turning techniques ensures smooth transitions and consistent tension throughout the project.
- Heel Flap Construction: Begin by crocheting a separate piece for the heel flap. Typically worked in rows or rounds, this flap provides durability and support.
- Reinforcement: Increase stitches at regular intervals to strengthen the heel area, preventing stretching and wear.
- Joining the Heel: Seamlessly attach the heel flap to the main body using a sturdy method such as the whip stitch or mattress stitch.
- Turning Techniques: When changing directions, ensure you maintain even tension to create neat and uniform edges. Use a turning chain if necessary to facilitate the change in direction without losing stitch count.
- Seamless Integration: Blend the heel with the rest of the project by gradually decreasing or increasing stitches, ensuring a smooth transition and consistent pattern flow.
Employing these techniques allows for the creation of a well-structured and durable heel, essential for items like socks, slippers, or garments requiring a firm foundation. Mastery of turning techniques ensures that your work remains consistent and aesthetically pleasing throughout the project.
Shaping the Toe: Tips and Tricks
Achieving well-shaped toenails enhances both appearance and foot health. Start by soaking your feet in warm water to soften the nails, making them easier to shape. Use a nail file to gently smooth the edges, following the natural curve of the toe to prevent ingrown nails. Avoid cutting toenails too short; leave a slight white edge to protect the nail bed. Incorporate the following tips for optimal shaping:
- Create a consistent shape across all toenails, such as round or square, to maintain uniformity.
- File in one direction rather than a back-and-forth motion to reduce splitting and damage.
- Trim straight across and slightly curve the edges to discourage ingrown toenails.
- Use quality tools, ensuring they are clean and sharp to make precise shaping easier.
- Moisturize regularly to keep the nails and surrounding skin healthy and flexible.
Finishing Touches: Weaving in Ends and Blocking
Completing a project involves meticulous weaving in ends and proper blocking to ensure durability and a professional appearance. Weaving in ends secures the loose yarn tails, preventing unraveling and maintaining the integrity of your work. To effectively weave in ends:
- Use a tapestry needle to thread the yarn tail through several stitches, hiding it within the fabric.
- Weave in the ends in multiple directions to ensure they are firmly anchored.
- Avoid pulling the yarn too tightly to prevent distortion of the project.
Blocking shapes and sets the stitches, enhancing the overall look and feel of your piece. Follow these steps for optimal blocking:
- Soak the completed item in lukewarm water with a mild detergent to relax the fibers.
- Gently squeeze out excess water without wringing the fabric.
- Lay the piece flat on a blocking board or a clean, padded surface.
- Shape the project to the desired dimensions, ensuring even proportions.
- Secure the edges with pins to maintain the shape while drying completely.
Properly weaving in ends and blocking not only enhances the appearance of your finished project but also extends its longevity, ensuring your handiwork remains beautiful and intact for years to come.